Industrial / Mechanical Design
Within the discipline of Industrial and Mechanical Design, the field can be classified into four principal domains: Product Design, Transportation Design, Environmental Design and Interaction Design. Each domain is defined by its unique functional objectives and application-specific parameters. Operating within the Product Development sector, our Industrial and Mechanical Designers are responsible for translating theoretical performance requirements and design intents into fully realized physical products through a systematic and engineering-driven approach.
This end-to-end process enables the development of physical products optimized for mass production, systematically integrating design innovation with engineering rigor to define form, function and feature sets that meet market requirements. On this page, we detail the core technical and design methodologies employed by our engineering and design teams.
In the intricate world of product development, where innovation drives progress, two key disciplines—Industrial Design and Mechanical Design—play a pivotal role. Though they may appear distinct, these fields work hand-in-hand to shape the products we use every day. This in depth explanation explores the fundamental differences between the two disciplines, illustrating how they collaborate to strike the perfect balance between aesthetics and functionality, supported by real-world examples.
Designing certain products can be particularly challenging—not only due to the technical complexity involved, requiring the integration of multiple engineering disciplines, but also because of the importance of aesthetic considerations. A prime example of such a consumer product is the car. It stands as both a design statement and a technical masterpiece, whether its powered by an electrical or combustion engine.
The automotive industry is a unique blend of technical and creative fields, involving Aesthetic Industrial Designers, Mechanical Engineers, Electrical Engineers and Electronics Developers. Given the crucial role that a car’s appearance plays, significant emphasis is placed on achieving an ideal balance between visual appeal and technological functionality—always striving for aesthetics first, without compromising performance.
Of course, a product’s aesthetic is closely tied to its category, intended functions and target users. Additionally, the client plays a major role in defining how a product should look. This vision is often influenced by their brand identity, marketing strategy, or overarching corporate image.
The typical industrial or mechanical design process involves several key stages: identifying the problem, generating ideas, selecting the most viable solution, developing prototypes, and conducting thorough testing.
█ Defining the problem
The first step in the process is identifying the problem that designers and engineers aim to solve. This issue can vary widely—from reducing the weight of a product’s housing to developing a new mechatronic component that leverages recently introduced technology.
█ Selecting the best solution
Each proposed solution must be carefully evaluated. Stakeholders need to assess potential production challenges associated with each concept to ensure feasibility and efficiency during manufacturing.
█ Prototyping
Once a solution has been selected, the next step is to develop prototypes. These are initially based on the mechanical engineer’s conceptual schematics, which are then refined and detailed by the mechanical designer to move closer to a production-ready model.
█ Testing
Using specialized design MCAD software, mechanical designers can rigorously test various prototypes in a virtual environment. These digital models can be exposed to different stress conditions and simulated real-world scenarios, allowing for the evaluation of multiple materials and part combinations without the need for physical prototypes.
This approach ensures that the final product meets all performance specifications and functions as intended. The mechanical designer plays a vital role throughout the entire process—from the initial concept and development to final testing and validation.
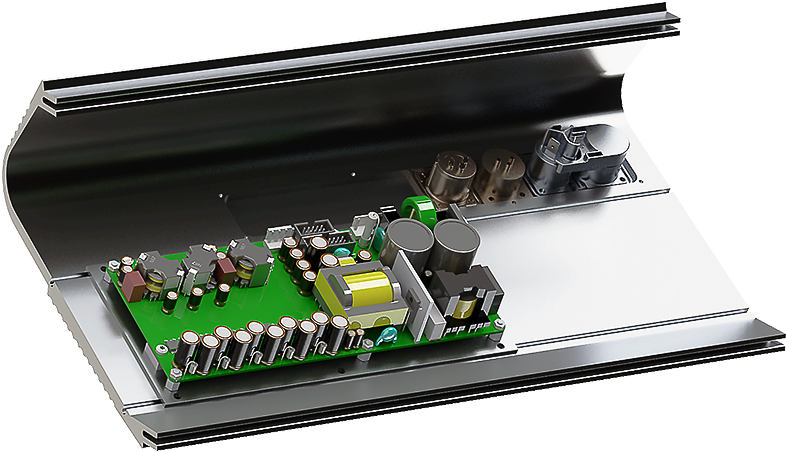
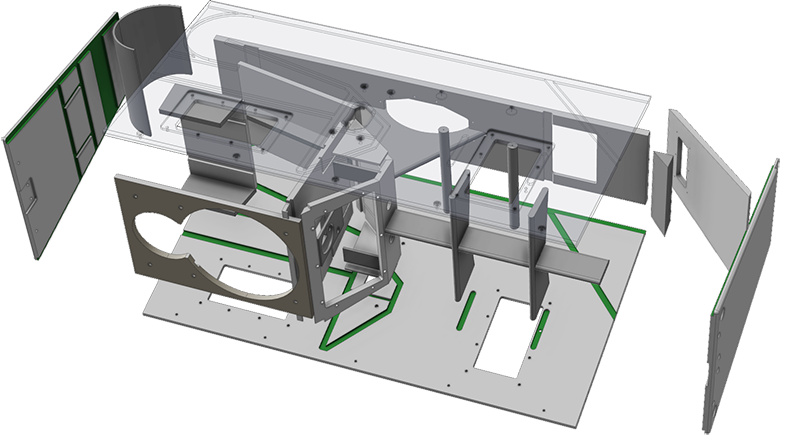
Once the design is finalized and ready for prototyping, the next crucial step is to assemble all the components. This allows the team to gain a clear understanding of how the final product will look and function as a whole.
The steps involved in creating a prototype and its physical design typically include:
█ Component Integration
Assembling individual parts based on the finalized design to form a complete prototype.
█ Material Selection
Choosing appropriate materials that reflect the intended functionality, durability and appearance.
█ 3D Printing / Machining
Using rapid prototyping methods like 3D printing, CNC machining, or injection molding to produce the physical parts.
█ Assembly & Fit Testing
Putting all components together to check alignment, fit and ergonomics.
█ Functional Testing
Evaluating the prototype’s performance under realistic conditions to identify any design flaws or improvements needed.
█ Iteration
Making necessary adjustments based on test results and repeating the process if needed.
Before creating the Actual Prototype, it is important to have a visual representation of what the product will look like. This requires us to ask our 3D Modeler/Industrial Designer to Design a 3D model of the prototype with the use of Solidworks™ or AutoDesk™ Inventor.
Once the 3D graphic model has been designed and developed, you can use it to market your product to customers and give them a realistic representation of the design and its appearance. You can also skip this step and just start constructing the physical copy of your product.
To Construct a 3D Prototype of the final product, an additive 3D printing process is used, in which layers of plastic are stacked on top of each other until a physical product representation is created. However, keep in mind that the resin, a type of liquid that hardens to turn into plastic, used in 3D printers is and also looks different from the production plastic used in Micro Injection Molding. MIM produced surfaces are made much smoother and with much smaller tolerances (10 to a 100 microns) than 3D printers can.
Once the actual prototype has been created, it is common to discover areas that require further development. We ensure that before we test the prototype, we have multiple versions available so that the testers can make an Accurate Prototype Evaluation. This phase may include multiple iterations of the prototype to ensure it has the right look, feel and functionality for your market-ready electronic final As-Built product.
With the prototype built, we move into the critical phase of testing and refinement. This step is essential before developing the comprehensive Production Manual and launching full-scale production. Following this, we begin creating Testing Pilots—the first hardware units manufactured during the entire product development process. Our team designs and builds these pilots based on insights gained from the prototype evaluation phase. The purpose of Testing Pilots is to collect valuable feedback from end users, validate product performance, and identify any remaining challenges or risks. This ensures the design is fully optimized and production-ready before entering mass manufacturing.
Once the prototype has been thoroughly tested and the As-Built documentation is complete, the development team proceeds to create a detailed Production Manual. This manual outlines the entire manufacturing process, specifying the required tools, jigs (which are designed and engineered by the team), and assembly procedures. It also includes information about suppliers, detailing where all necessary components can be sourced. Essentially, the Production Manual serves as a comprehensive guide for how the product should be manufactured and assembled.
Once all stakeholders have approved the final As-Built version of the product, manufacturing begins. Simultaneously, a marketing strategy is developed and launched to promote the product. In many cases, even before the product is officially released, a marketing campaign is initiated to build anticipation, reach the target audience, and inform them about the upcoming launch.
More Specifics...
The industrial and mechanical design behind high-end audio and automation systems goes far beyond a single-page overview. From thoughtful ergonomics and heat dissipation to premium materials, precision craftsmanship and vibration control — every detail impacts performance and aesthetics. Our approach balances durability, functionality and innovation. Curious about our design philosophy or specific mechanical challenges? Reach out by phone or email — we’d be happy to discuss your design issues / interests and share possible design or engineering solutions.
Abilities driving results
A review of project outcomes and supporting data shows that 92% of our projects met the agreed development timeline—a steady improvement from previous years. This progress is the result of ongoing enhancements to our workflows, proactive risk management and improved team coordination. We remain committed to refining our approach to ensure your product is delivered reliably and on schedule.